
10ldman
Posted: Mon Dec 20, 2010 5:05 pm
Looks like I've got a leak from my left side crank seal. Does anyone know if this can be pulled without splitting the cases? Manual shows that the factory seal has a lip on it that fits into a groove but parts shows that there is a replacement seal without the lip. Anyone done this?
____________________________________________________________________________________
BirdofPrey97
Posted: Wed Mar 09, 2011 :
Yes it can can be removed and replaced without splitting the cases. I have removed my old hard one. Order 2 seals just in case you mess up the old one. In my case when I replaced it. It was very hard and hard to remove. I had to collapse the inner part of the seal and use a flat blade to remove it. I spent an hour trying to get it off the bike. It was that hard. (My second time since the seal was newer was very easy!)
*** Be careful not to scratch the cases or the crank***.
I packed some grease on the back side of the seal to insure the spring stays in place. (it will try and come out!) I put a film of lube on the crank shaft and slowly rotated the seal on to the crank. You then may need to take a small pocket screw driver and use it to to held get the inner part of the seal onto the crank shaft. Once installed and lightly pressed in to the case. I used a l large socket (That fit the outer diameter of the seal) and rubber hammer to drive it home lightly.
*** I still had a slight leak on mine. One I created! It was from a scratch in the case when I removed the seal the first time. I removed the seal and installed the second one I had. I then used RTV around the seals outer diameter to the case to help seal the scratch I found. It took care of my leak from the original BAD seal..... ***
____________________________________________________________________________________
cityevader
Posted: Wed Mar 09, 2011
Was the first one you removed the lip-type? What sort of material is the lip? Is it hard plastic or soft rubber?
My left seal is getting worse it seems. Funny though, it leaves a little puddle at work but not at home.
____________________________________________________________________________________
BirdofPrey97
Posted: Thu Mar 10, 2011
The seal is made of soft rubber. It has a lip on the inner part and is spring loaded. My seal was so hard it felt like plastic. Leaked pretty good too. I also replaced to o'rings on the lower plug too. Both were leaking! Just make sure you get 2 seals. One my first installation... It was good, but didnt realize I had scratched the case where the seal fits into on its outer diameter. My leak was a lot smaller then the bad old seal. Also be careful the spring in the seal can pop out easily. Use grease to help hold it in place. I did use a pocket flat blade screw driver to help assist the inner lip on to the crank shaft.
___________________________________________________________________________________
cityevader
Posted: Thu Mar 10, 2011 5:35 am Post subject:
My typical method of seal removal in cars is to drill a tiny hole, insert a tiny screw, and pry using diagonal cutters against the screw head. Do you think a) the seal has enough solid material for the screw to grab? b) there is enough strength in that for the lip's overcoming the friction of it sitting in its groove?
I hate to start a project and realize after the point of no return that much more work is needed.
____________________________________________________________________________________
BirdofPrey97
Posted: Thu Mar 10, 2011
I use the same method you described too, but in my case.... 33k on the engine. That methd didnt work! It may work on yours though. I first did that screw into the seal 180 degrees out from each other and pull evenly with vise grips. But the seal came apart and left the outer ring of it seal against the cases. I tried to work it out with a flat blade and seal removal tool. No go! I then had to lightly tap it inward towards the crank with a small screw driver. Pain in the rear to say the least.
____________________________________________________________________________________
10ldman
Posted: Sun Mar 20, 2011 9:20 pm
The factory seal Has a rubber coated steel shell with a lip in the steel that goes up into the groove in the crankcase and it a genuine S.O.B. to get out. You have to chisel thru the steel shell to get the seal out. I wouldn't recommend trying it unless you had a lift to put the bike up on. It took me 2 days, off and on, and a couple of trips to the hardware store to get mine out. And there were times there that I thought I was going to have to pull the engine and split the cases to actually get it out.

_______________________________________________________________________________
cityevader
Posted: Mon Mar 21, 2011
So now that you've got some practice, wanna do mine? Should only take a day and a half for the second one.
____________________________________________________________________________________
10ldman
Posted: Mon Mar 21, 2011
Once is enough for me, thanks. Why it really took so long is not knowing the anatomy of the seal to start with. I was flying blind all the way and under the assumption that the outer lip was just rubber and that I would be able to tear it away from the main body of the seal to get it out but the thing would not just pop out. Only after I got it out did I see that the steel case went all the way up into the lip. I'll try to clean up that seal a little and get some better pictures so you can see just how it
is made.
____________________________________________________________________________________
cityevader
Posted: Mon Mar 21, 2011
I just figured it was made that way, and was trying to get that out of Birdofprey without actually saying he was wrong, since I did not in fact do this repair nor see the seal in person.
_____________________________________________________________________________________
10ldman
Posted: Mon Mar 21, 2011
Here's are some better pictures of that seal.
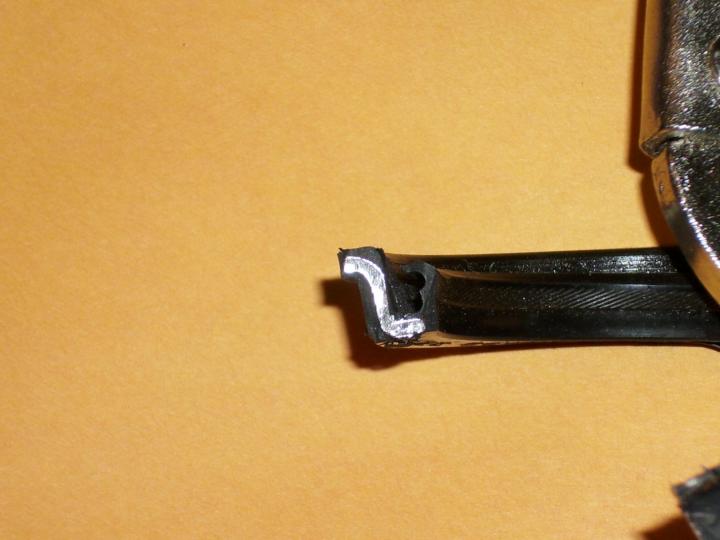
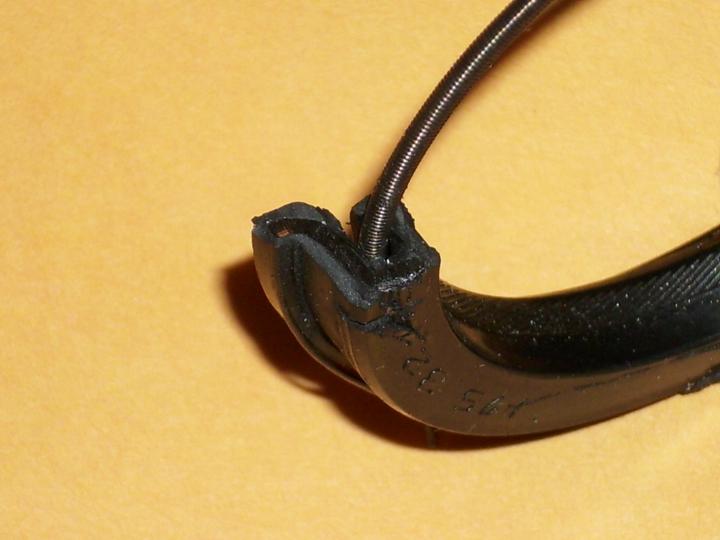
The old and new seal together
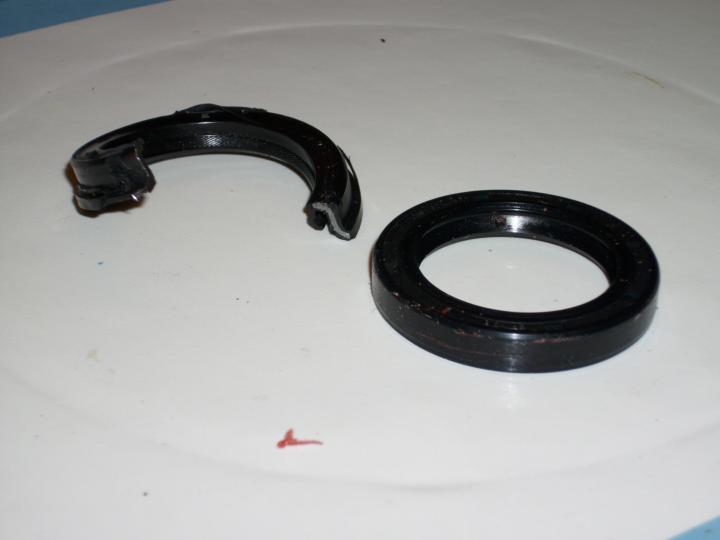
The tools used

____________________________________________________________________________________
cityevader
Posted: Mon Mar 21, 2011
Sorry, Birdofprey...I didn't actually mean to insinuate that you were wrong in above post. I should have phrased it better. You clearly have much more motorcycle repair history than I do and I wasn't trying to belittle that...rather, I was searching for more information on the seal construction. That being off my chest...
Two confirmed cases of seal removal without engine removal....any other stories from others?
For Birdofprey and 1oldman, any suggestions on approach? My imagination says it needs to have the steel part totally sliced in order to "spiral" the circle a bit to make the diameter smaller...is this the case?
____________________________________________________________________________________
10ldman
Posted: Mon Mar 21, 2011
Yes, essentially that's the only way you're going to get it out but bear in mind it's a very risky operation in that the potential to damage the crank is high. If you're going to attempt this I'd recommend the motorcycle be on a lift where you can work on it at eye level then try to protect the crank by sliding a feeler gauge underneath the seal to keep the crank from being scratched. You would have to make a very small chisel by grinding down a small punch or screw driver. Drill a small hole in the steel shell at the point of attack and get something into the hole to try to warp it out so you can get a hold on it. Next try to get a small flat blade screw driver between the seal and case and warp it down then go to work with the chisel. I used a fair amount of carburetor cleaner to try to break down the rubber coating. Protect the crank at all costs. Wrap some duct tape around it for protection and to hold the feeler gauge in place. Like I said, this is a risky operation