
When would you re-jet your Seca II?
As I'm sure you've read, the Yamaha Seca II is jetted lean from the factory, at least, on the pilot circuit. Yamaha fit the Mikuni BDS26 carburetors with a #102.5 main jet and a #17.5 pilot jet. A common carburetor modification for the stock carbs is to replace the stock #17.5 pilot jet with a #20 pilot jet. This will improve cold-startup and will also improve partial throttle performance when warm.
Additionally, if you've modified both the intake and the exhaust on your Seca II, re-jetting the main jets is likely needed to restore proper performance. (Note: Main jet replacement is typically not needed on an XJ that is stock, or one that has only exhaust or one that has only intake modifications. Main jets are only replaced if you've altered the airflow through the engine by changing both the intake and exhaust).
What Kind of Jets do you Need?:
Each carburetor uses one main jet and one pilot jet. To replace all of the jets, you would need (4) main jets and four (4) pilot jets. When re-jetting, order replacement jets before you pull the carburetors and ensure that they are the correct size for your application. This will save you some downtime if the wrong part is received.
The main jets are Mikuni N100-604 jets and are available in 2.5 increments.
- For the main jets: The stock size is 102.5. The next size up from stock is a 105 and the next size down from stock is a 100.
http://www.jetsrus.com/a_jets_by_carbur ... _round.htm
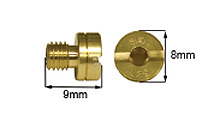
- For the pilot jets: The stock size is 17.5. The next size up from stock is a 20 and the next size down from stock is a 15.
http://www.jetsrus.com/a_jets_by_carbur ... _pilot.htm
How to replace the jets in your Seca II carburetor:
Access the carburetors main and pilot jets: The main & pilot jets are located inside the float bowl. To replace them, the float bowl must be removed. This CAN be done with the carburetors on the bike but is much easier to do with the carburetors removed.
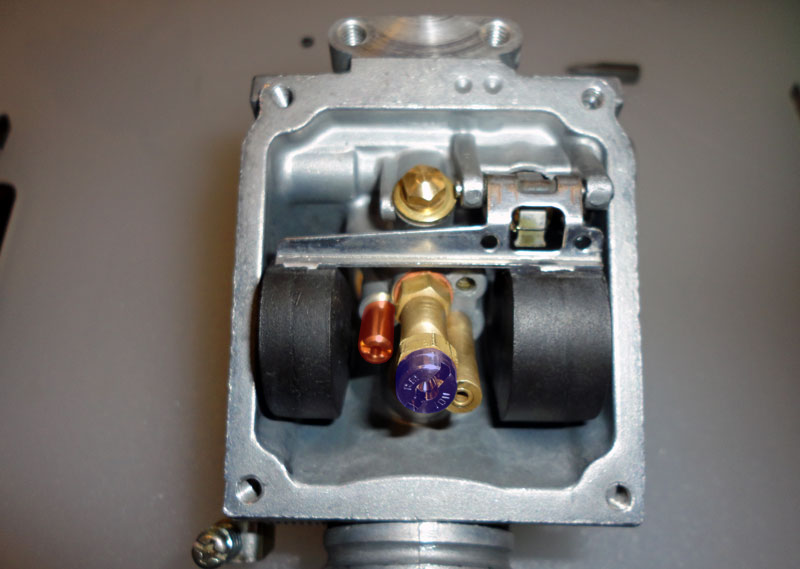
Remove the carburetor assembly from the bike, drain it of all fuel and remove the float bowl. Here is what you'll see under the float bowl. The main & pilot jets are highlighted in the photo below: The main jet is shown in blue. The pilot jet is shown in red.
Using a wide-blade and well-fitting standard screwdriver, unscrew the jet you are replacing and take a quick look at it. Verify that it is the size you expect it to be. Ensure that the new jet is positively clean and screw it in place. Be careful; these jets are soft brass and will strip or shear-off easily. Tight is tight-enough.
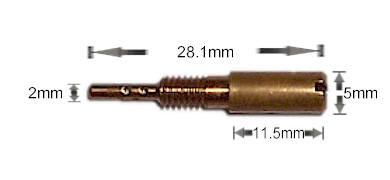
A note on Main Jet O-rings:
When replacing the main jets, there is a small O-ring which fits between it and the main jet holder. Be sure to remove the old O-ring and replace it with a new one before fitting the new main jet. The main-jet O-rings are sized as follows:
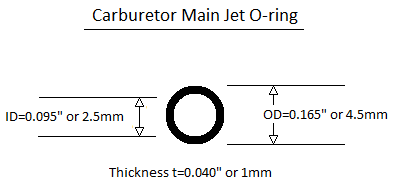
They are O-rings with a square cross section. I do not believe that this square cross section is absolutely needed and a standard O-ring should work fine. Using these measurements, I've found a cheap alternative that should work well.
McMaster CARR P/N 9262K511 which sells for $4.50 for 100 O-rings.
Post re-jet tuning:
Once you've re-jetted your carburetors, some post-jet tuning may be required. If pilot jets were upgraded from #17.5 to #20, no changes should be needed. If pilot jets were changed substantially or if main jets were changed, the pilot screws should be adjusted to restore fuel mixture at idle.